Script
The Script tool executes a user-defined Python-based script. For a list of the tool's supported classes and methods, see Functions and Classes.
For examples, see Examples.
The tool supports all GoPxL data types as input and output:
- Surface and Profile data (including intensity)
- Measurements (values and decisions, and anchor sources for other tools)
- Geometric features
- Arrays of the supported types

|
The Script tool does not support writing files when it is running on a sensor or GoMax NX device, and will display a permissions error if you attempt this. Writing to files is only supported when the tool is running on a PC instance of GoPxL. When writing to files, you should explicitly set the path to a writable location. |
The tool does not support using print(), sys.stdout, or Python's logging module functions to send messages to GoPxL’s system log. Instead, use one of the “log_” functions. For more information, see Logging.
Script tools are added, configured, and removed like other measurement tools.
|
|
The Script tool uses Python version |
For information on adding, managing, and removing tools, as well as detailed descriptions of settings common to most tools, see Tool Configuration.
Included Python Modules
In addition to the standard Python library modules, the tool also includes the NumPy 1.19 module. NumPy is useful for operating on arrays.
On Windows, you can install additional modules with pip by running the following command under the GoPxL\res\python folder:
python3.exe -m pip install <modulename>
Note that for some libraries you may need to specify a specific version to ensure compatibility with the version of Python included with GoPxL.
Inputs
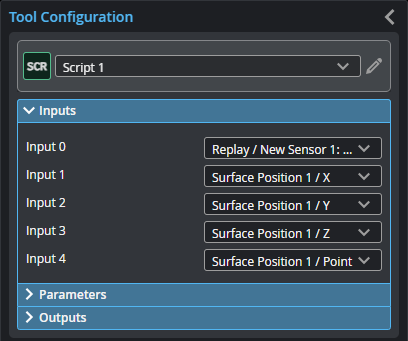
You configure the tool's inputs in the expandable Inputs section.
| Name | Description |
|---|---|
|
Input {n} |
Selects the input for the script where {n} is the index of the input. All input types are allowed. Input cannot be ‘None’. In the get_ functions' index parameters, use this index. The Number of inputs parameter (see below) determines the number of inputs. This tool can optionally take an array as input. For more information, see Arrays, Batching, and Aggregation. |
Parameters
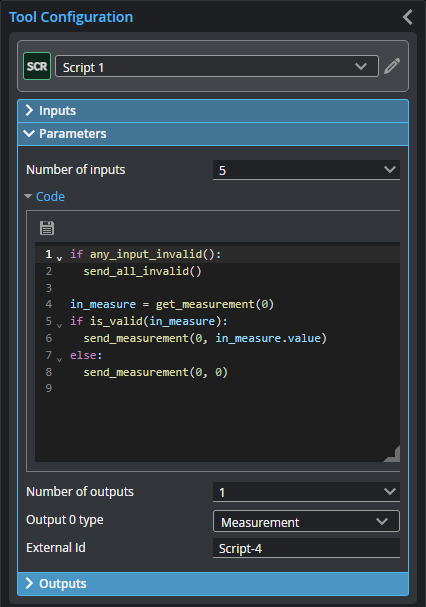
You configure the tool's parameters in the expandable Parameters section.
| Name | Description |
|---|---|
| Number of Inputs |
Specifies the number of inputs needed in the script. |
|
Code |
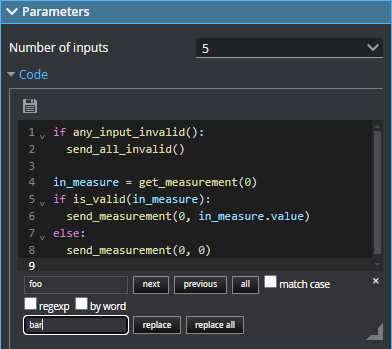
The Python code the tool runs. Supports expanding and collapsing of code blocks. You can resize the editor vertically with the grabber to the lower left of the editor. You can resize the width of the editor by resizing the Tool Configuration panel. The following keyboard shortcuts are available in the editor. Ctrl-S: Saves the script. The tool checks the syntax. Use Cmd-S on macOS. Ctrl-F: Opens a search and replace panel. The search and replace panel supports regular expressions. Use Cmd-F on macOS. To close the panel, click the "x" to the upper right.
Ctrl-D: Highlights all occurrences of the word under the cursor. Each time you press Ctrl-D after that, the cursor moved to the next occurrence. Use Cmd-D on macOS. Alt-ArrowLeft / Alt-ArrowRight: Move the cursor over the next element to the left or right, respectively. Alt-ArrowUp / Alt-ArrowDown: Move the selected lines up or down one line, respectively. Combining this with Shift copies lines instead. Ctrl-/: Toggles commenting. Use Cmd-/ on macOS. Ctrl-[ / Ctrl-]: Decreases or increases the indentation of the selected line. Use Cmd-[ or Cmd-] on macOS. |
|
Number of outputs |
Specifies the number of outputs the script produces. |
| Output type {n} | Selects the output type for each output, where {n} is the index of the output. |
|
External ID |
The external ID of the tool that appears in GoHMI Designer. For more information, see GoHMI and GoHMI Designer. |
Outputs
Most tools provide measurements, geometric features, or data as outputs.
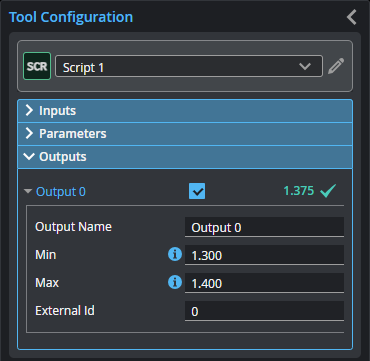
Outputs section with a measurement expanded to show user-configurable decision min/max fields and an external ID
You configure the Min and Max parameters by expanding the measurement in the Outputs section. In order for a measurement to return a Pass decision, the measurement must be between maximum and minimum values; the range is inclusive.
| Measurement |
|---|
|
Output {n} Output from the Python script, where {n} is the index of the output. The number of outputs and the type of each output is determined by the Number of outputs and Output type {n} parameters, respectively. |
Functions and Classes
Getting Input
The following Python functions are available for performing input operations and testing input validity.
The index of the input is given as an argument. If the input at the index is missing or it is the wrong type, None is returned. Functions will return an array if input is an array.
For information on the returned types, see Data Structures.
| Function | Description |
|---|---|
| is_valid(obj) |
Checks whether the object is valid or not. |
| get_surface(index) |
Gets a surface message or array of messages from the specified input. |
| get_profile(index) |
Gets a profile message or array of messages from the specified input. |
| get_measurement(index) |
Gets a measurement message or array of messages from the specified input. |
| get_point(index) |
Gets a point message or array of messages from the specified input. |
| get_circle(index) |
Gets a circle message or array of messages from the specified input. |
| get_plane(index) |
Gets a plane message or array of messages from the specified input. |
| get_line(index) |
Gets a line message or array of messages from the specified input. |
| get_image(index) |
Gets an image message or array of messages from the specified input. |
Sending Output
The following Python functions are available for performing output operations.
The index of the output is given as an argument.
For information on the output types, see Data Structures.
| Function | Description |
|---|---|
| is_output_enabled(index) |
Checks whether the output at the specified index is enabled. |
| send_surface(index, offset, scale, points, intensity=None, is_adjacent=None, header=None) |
Sends a surface message or array of messages to the specified output. |
| send_profile(index, offset, scale, points, intensity=None, slices=None, header=None) |
Sends a profile message or array of messages to the specified output. |
| send_measurement(index, value, label_position=None, header=None) |
Sends a measurement message or array of messages to the specified output. Note that the decision can’t be set with this function because the decision of a measurement is only set after output using the Min and Max thresholds on the outputs. |
| send_point(index, position, header=None) |
Sends a point message or array of messages to the specified output. |
| send_line(index, position, direction, header=None) |
Sends a line message or array of messages to the specified output. |
| send_circle(index, position, normal, radius, header=None) |
Sends a circle message or array of messages to the specified output. |
| send_plane(index, normal, origin_distance, header=None) |
Sends a plane message or array of messages to the specified output. |
| send_image(index, pixels, pixel_format= PixelFormat.MONO_8, flipped_x=False, flipped_y=False, transposed=False, header=None) |
Sends an image message or array of messages to the specified output. |
Logging
Logging a message causes GoPxL to add a message to the log at the bottom of the user interface. There are three types of log messages.
| Function | Description |
|---|---|
| log_info(msg) |
Logs a user informational message. |
| log_warning(msg) |
Logs a user warning message. |
| log_error(msg) |
Logs a user error message and displays a pop-up containing the message. |
Memory
You can use a Script tool's memory dictionary for storing values during runtime. The dictionary is erased when scanning starts.
Data Structures
| Function | Description |
|---|---|
| Region |
2D Region box (Corner type). |
| Region3d |
3D Region box (Corner type). |
| Rect3d |
3D rectangular region box. |
| Anchor3d |
3D anchor (Corner-based). |
| Point |
2D Point class. |
| Point3d |
3D Point class. |
| Stamp |
Represents acquisition metadata associated with a data message. Note that width, height, x, and y parameters refer to the dimensions of the camera image; for more information, see points in SurfaceMsg. |
| Transform3d |
3D transform matrix. |
| MsgHeader |
Header class of data message. |
| PixelFormat |
Enum class of pixel formats for image data message.
Mono formats MONO_8 = <PixelFormat.MONO_8: 0x0001> MONO_10 = <PixelFormat.MONO_10: 0x0003> MONO_12 = <PixelFormat.MONO_12: 0x0005> MONO_14 = <PixelFormat.MONO_14: 0x0025> MONO_16 = <PixelFormat.MONO_16: 0x0007>
RGB formats RGB_8 = <PixelFormat.RGB_8: 0x0014> BGR_8 = <PixelFormat.BGR_8: 0x0015> RGB_10 = <PixelFormat.RGB_10: 0x0018> BGR_10 = <PixelFormat.BGR_10: 0x0019> RGB_12 = <PixelFormat.RGB_12: 0x001A> BGR_12 = <PixelFormat.BGR_12: 0x001B> RGB_14 = <PixelFormat.RGB_14: 0x005E> BGR_14 = <PixelFormat.BGR_14: 0x004A> RGB_16 = <PixelFormat.RGB_16: 0x0033> BGR_16 = <PixelFormat.BGR_16: 0x004B>
YUV/YCBR formats Y_CB_CR_8_CB_Y_CR = <PixelFormat.Y_CB_CR_8_CB_Y_CR: 0x003A> Y_CB_CR_411_8_CB_YY_CR_YY = <PixelFormat.Y_CB_CR_411_8_CB_YY_CR_YY: 0x003C> Y_CB_CR_422_8_CB_Y_CR_Y = <PixelFormat.Y_CB_CR_422_8_CB_Y_CR_Y: 0x0043>
Bayer formats BAYER_GR8 = <PixelFormat.BAYER_GR8: 0x0008> BAYER_RG8 = <PixelFormat.BAYER_RG8: 0x0009> BAYER_GB8 = <PixelFormat.BAYER_GB8: 0x000A> BAYER_BG8 = <PixelFormat.BAYER_BG8: 0x000B> BAYER_GR10 = <PixelFormat.BAYER_GR10: 0x000C> BAYER_RG10 = <PixelFormat.BAYER_RG10: 0x000D> BAYER_GB10 = <PixelFormat.BAYER_GB10: 0x000E> BAYER_BG10 = <PixelFormat.BAYER_BG10: 0x000F> |
| ImageMsg |
ImageMsg class for image data message. |
| SurfaceMsg |
SurfaceMsg class for surface data message. |
| ProfileMsg |
ProfileMsg class for profile data message. |
| MeasureMsg |
MeasureMsg Class for measurement data message. |
| MeasurementDecision |
Enum class of decision type for measurement data message.
FAIL= <MeasurementDecision.FAIL: 0> PASS= <MeasurementDecision.PASS: 1> |
| PointFeatureMsg |
PoinFeaturetMsg class for point feature message. |
| LineFeatureMsg |
LineFeatureMsg class for line feature message. |
| CircleFeatureMsg |
CircleFeatureMsg class for circular feature message. |
| PlaneFeatureMsg |
PlaneFeatureMsg class for planar feature message. |
Examples
Measurement input and output
The following example shows how to read a measurement value input and output a new measurement value that is equal to the input multiplied by a factor of two.
# Get the measurement object at input 0
measurement = get_measurement(0)

# Extract the value from the measurement
measurement_value = measurement.value

# Calculate a new measurement value
measurement_output = 2 * measurement_value

# Send the calculated value as a new measurement to output 0
send_measurement(0, measurement_output)
The following example shows how to read measurement value inputs and write them to a CSV file. (This example is only intended for use on a PC instance of GoPxL, as writing to files on-sensor or on a GoMax device is blocked.)
import csv

# Get measurement objects
measurement_1 = get_measurement(0)
measurement_2 = get_measurement(1)

# Extract values from measurement objects
measurement_1_value = measurement_1.value
measurement_2_value = measurement_2.value

# Path to the output CSV file
output_path = r'C:\GoTools\Script\measurement.csv'

# Write measurements to CSV file
with open(output_path, 'a') as f:
    writer = csv.writer(f)
    writer.writerow([measurement_1_value, measurement_2_value])
Math operations
You can access mathematical operations through the standard Python math module.
# Import the math module to access mathematical functions
import math

# Get the measurement object at input 0
measurement = get_measurement(0)

# Extract the value from the measurement
measurement_value = measurement.value

# Calculate the square root of the absolute value using the Math module
sqrt_value = math.sqrt(math.fabs(measurement_value))

# Send the square root as a new measurement to output 0
send_measurement(0, sqrt_value)
Accessing valid/invalid and decision pass/fail
You can use the is_valid() function of the MeasureMsg class to check whether the value is valid or invalid. An invalid measurement is represented by the value numpy.nan. Other input classes also have is_valid() functions, which return true if the object data is not null.
The pass/fail criteria for the input MeasureMsg can be checked using the decision member variable.
# Check if any inputs are invalid
if any_input_invalid():
  send_all_invalid()

# Get the input measurement
measurement0 = get_measurement(0)

# Access validity from a measurement
if is_valid(measurement0):
  log_info("The input measurement is Valid")
else:
  log_info("The input measurement is Invalid")

# Access decision from a measurement
if measurement0.decision == MeasurementDecision.PASS:
  log_info("The input measurement has a Pass decision")
else:
  log_info("The input measurement has a Failed decision")
Stamp access
profile = get_profile(0)

stamp = profile.header.stamp

log_info('Stamp = {}'.format(vars(stamp)))

send_measurement(0, stamp.frame)
send_measurement(1, stamp.time)
send_measurement(2, stamp.encoder)
Arrays
The following code reads an array input and outputs an array.
# Get an array of measurement objects at input 0
measurements = get_measurement(0)

# Extract the values from each measurement object
measurement_values = []
for measurement in measurements:
    measurement_values.append(measurement.value)

# Calculate new values
measurements_output = [value * 2 for value in measurement_values]

# Send the calculated values as an array to output 0
send_measurement(0, measurements_output)
Inverting a Surface in Z with null handling
The following code inverts a Surface in Z with null handling. It also shifts the output Surface in X by the bounding box width in order to not overlap the original.
surf = get_surface(0)

flipped_points = surf.points.copy()
flipped_offset = surf.offset

flipped_points[flipped_points != -32768] *= -1
flipped_offset.x += surf.header.bounding_box.width

send_surface(0, flipped_offset, surf.scale, flipped_points, surf.intensity)
Minimum and maximum Z value of a uniform Surface with null handling
surf = get_surface(0)

s = surf.points[surf.points != -32768]

max_z = numpy.max(s) * surf.scale.z + surf.offset.z
min_z = numpy.min(s) * surf.scale.z + surf.offset.z

send_measurement(0, min_z)
send_measurement(1, max_z)
Grid of coordinates for anchoring
The following script shows how you can perform the same inspection using a single tool at many locations on a grid. It generates X and Y measurement arrays that you use as anchor inputs in another tool (the anchored tool).
In the anchored tool, you must check Enable batching so that the tool generates an array of outputs.
x = numpy.linspace(-15, 15, 10) # 10 points spanning 0..30 mm range
y = numpy.linspace(-15, 15, 10) # 10 points spanning 0..30 mm range

xv, yv = numpy.meshgrid(x, y)

send_measurement(0, xv.flatten())
send_measurement(1, yv.flatten())
Image processing (subtracting two images)
im0 = get_image(0)
im1 = get_image(1)

delta = im0.pixels.astype(numpy.float32) - im1.pixels.astype(numpy.float32)
stdev = numpy.std(delta)

new_pixels = numpy.clip(delta / (2*stdev) * 128 + 128, 0, 255).astype(numpy.uint8)

send_image(0, new_pixels, PixelFormat.RGB_8)
send_measurement(1, stdev)
Image processing (forward to HTTP server)
# Script (using built in urlib package)
import urllib.request
import json
import numpy as np

# Assuming get_image(0).pixels returns a numpy array
array = get_image(0).pixels
array_bytes = array.tobytes()

# Encode shape information as JSON in the headers
headers = {'Content-Type': 'application/octet-stream', 'X-Array-Shape': json.dumps(array.shape)}
url = 'http://127.0.0.1:5000/receive_array'

# Encode array bytes data and prepare request
req = urllib.request.Request(url, data=array_bytes, headers=headers)
urllib.request.urlopen(req)


# SERVER (server.py)

from flask import Flask, request, Response
import numpy as np
import cv2
import json

app = Flask(__name__)

@app.route('/receive_array', methods=['POST'])
def receive_array():
    # Get the content of the request
    data = request.data

    # Extract shape information from headers
    shape_info = json.loads(request.headers.get('X-Array-Shape'))
    height, width, channels = shape_info

    # Extract image bytes
    image_array = np.frombuffer(data, dtype=np.uint8)
    image_array = image_array.reshape((height, width, channels))

    # Display image
    #cv2.imshow('Received Image', image_array)
    #cv2.waitKey(0)
    #cv2.destroyAllWindows()

    # Print size of received image
    print("Received image size:", image_array.shape)

    return Response(status=200)

if __name__ == '__main__':
    app.run(debug=False, threaded=True, port=5000)
The following is a sample client to demonstrate the functionality of the HTTP server forwarding snippet above.
# SAMPLE CONSOLE CLIENT (client.py)
# A standalone demonstration of the functionality used by the image HTTP
# forwarding script.

import requests
import numpy as np
import json

# Assuming you have a function to generate numpy arrays as images
def generate_numpy_array():
    # Generating a sample numpy array
    array = np.random.rand(100, 100, 3) * 255  # Random 100x100x3 array of floats between 0 and 255
    return array.astype(np.uint8)

def send_array_to_server(array):
    url = 'http://127.0.0.1:5000/receive_array'
    array_bytes = array.tobytes()

    # Encode shape information as JSON in the headers
    headers = {'Content-Type': 'application/octet-stream', 'Array-Shape': json.dumps(array.shape)}

    response = requests.post(url, data=array_bytes, headers=headers)

# Generate and send arrays to the server
while True:
    array = generate_numpy_array()
    send_array_to_server(array)
Profile processing (using a profile from disk as a correction to new profiles from sensor)
# Save profile template to disk
import csv

profile = get_profile(0)
points = profile.points

template_path = r'C:\GoTools\Script\profile.csv'
numpy.savetxt(template_path, points, delimiter=',', fmt='%d')

send_measurement(0, 1)

# Load and correct
import csv

profile = get_profile(0)
points = profile.points

# load template
template_path = r'C:\GoTools\Script\profile_template.csv'

if 'template' not in memory:
    template_points = numpy.genfromtxt(template_path, delimiter=',', dtype=numpy.int16)
    memory['template'] = template_points
    log_info("Loaded template")
else:
    template_points = memory['template']

# subtract while handling null values
mask = (template_points != -32768) & (points != -32768)
result = numpy.full_like(points, -32768)
numpy.subtract(points, template_points, out=result, where=mask, dtype=numpy.int16)

send_profile(0, profile.offset, profile.scale, result)

# optionally send original profile and template as outputs
send_profile(1, profile.offset, profile.scale, points)
send_profile(2, profile.offset, profile.scale, template_points)

# optionally save all three into a new CSV file

output_path = r'C:\GoTools\Script\profile_log.csv'
combined_array = numpy.vstack((points, template_points, result)).T

with open(output_path, 'w', newline='') as csv_file:
    writer = csv.writer(csv_file)
    writer.writerow(['Profile', 'Template', 'Difference'])
    writer.writerows(combined_array)
Getting function signatures
Instead of looking up functions in the manual to see arguments to be passed in, you can use the signature function in the inspect module to get the signature of any function. For example, the code below displays an error message: (index, value, label_position=None, header=None).
from inspect import signature

log_error(str(signature(send_measurement)))
FTP - Writing numpy or CSV files to disk, and sending them to an FTP server
import numpy as np
import csv
import os
from ftplib import FTP

from datetime import datetime

surface = get_surface(0)

xRes = surface.scale.x
yRes = surface.scale.y
zRes = surface.scale.z
xOff = surface.offset.x
yOff = surface.offset.y
zOff = surface.offset.z
length = surface.points.shape[0]
width = surface.points.shape[1]
size = width*length

# scale Z points to engineering units
Z = surface.points.copy()
Z = Z.astype(np.double)
Z.setflags(write=1)
Z[Z==-32768] = np.nan
Z = Z*zRes+zOff
Z = np.round(Z, 10)

# 1D array example:
# generate X array
Xarr = (np.asarray(range(width), dtype=np.double) * xRes) + xOff
Xarr = np.tile(Xarr, length)
# generate Y array
Yarr = (np.arange(length, dtype=np.double)* yRes) + yOff
Yarr = np.repeat(Yarr, repeats=width)
# flatten and generate Z array
Zarr = Z
Zarr = Zarr.flatten()
Zarr = (Zarr * zRes) + zOff
# stack arrays
data_3DXYZ = np.stack((Xarr,Yarr,Zarr), axis = 1)
data_3DXYZ = data_3DXYZ.round()

# generate local path
now = datetime.now()
unique_filename = now.strftime("%Y-%m-%d_%H-%M-%S_XYZ.npy")
documents_path = os.path.join(os.environ['USERPROFILE'], 'Documents')
writePath = os.path.join(documents_path,unique_filename)

# save numpy file, default example
np.save(writePath,data_3DXYZ)

# save csv file
#with open(writePath,'w',newline='') as csvfile:
#    writer = csv.writer(csvfile,delimiter=',')
#    writer.writerow(["X","Y","Z"])
#    writer.writerows(data_3DXYZ)


# 2D array example:
'''
# Custom header elements for post processing
header_title_elements = ["xRes", "yRes", "zRes",
                        "xOff", "yOff", "zOff",
                        "length","width","size"]
header_title_string = ','.join(header_title_elements)

header_elements = [str(xRes), str(yRes), str(zRes),
                   str(xOff), str(yOff),str(zOff),
                   str(length), str(width), str(size)]
header_data_string = ','.join(header_elements)

# generate local path
now = datetime.now()
unique_filename = now.strftime("%Y-%m-%d_%H-%M-%S_XYZ.csv")
documents_path = os.path.join(os.environ['USERPROFILE'], 'Documents')
writePath = os.path.join(documents_path,unique_filename)

# Write the headers to the file
#with open(writePath, 'w') as f:
#    f.write(header_title_string + '\n')  # First line of headers (titles)
#    f.write(header_data_string + '\n')   # Second line of headers (actual values)

#with open(writePath, 'ab') as f:  # Open as binary to avoid issues across different Python versions
#    np.savetxt(f, Z, delimiter=',', fmt='%s')
'''

#Send file over FTP

# FTP server details
ftp_host = '127.0.0.1'
ftp_username = 'tester'
ftp_password = 'password'
file_path = writePath  # The local path to your file
remote_path = '/' + unique_filename  # The remote path where you want to upload the file

# Establish FTP connection and login
if 'FTP' not in memory:
    ftp = FTP(ftp_host)
    ftp.login(ftp_username, ftp_password)
    memory['FTP'] = ftp
ftp = memory['FTP']

try:
    # Open the file in binary read mode
    with open(file_path, 'rb') as file:
        ftp.storbinary(f'STOR {remote_path}', file)
except Exception as e:
    log_info(f"An error occurred: {e}")