GoPxL SDK and REST API
The GoPxL Software Development Kit (GoPxL SDK) includes open-source software libraries and documentation that you can use to programmatically access and control GoPxL devices.

|
The GoPxL SDK and REST API use the term "scanner" instead of "sensor group." The two are interchangeable. |
|
|
The GoPxL SDK uses mm, mm2, mm3, hertz, microseconds, and degrees as standard units unless otherwise mentioned. |
The following sections describe the Software Development Kit (GoPxL SDK).
Installation Guide
Location of GoPxL SDK and Documentation
The GoPxL SDK, and the SDK and REST API references are available in the 14630-1.1.x.x_SOFTWARE_GoPxL_SDK.zip package.
The zip file contains both a C++ and a .NET SDK organized as follows:
- GoPxL_SDK_Cpp\
- GoPxL_SDK_dotNet\
Visual Studio Solution Files and Linux Makefile
For Windows, Visual Studio solution files are included for both the C++ and .NET SDKs.
- C++: GoPxL_SDK_Cpp\Gocator
- .NET: GoPxL_SDK_dotNet\Gocator
For Linux, first ensure that you have the g++ compiler package and then run the following command from the GoPxL_SDK_Cpp\Gocator\GoPxLSdk directory:
make -f GoPxLSdk-Linux_X64.mk
Note that only the C++ SDK is supported on Linux.
Building the SDK
To compile in Visual Studio, you may need to retarget the solution to the installed Windows SDK version. To retarget a solution, open the solution in Visual Studio, right-click the solution in the Solution Explorer, choose Retarget solution in the context menu. In the dialog box that appears, select the desired version from the drop-down list and click OK.
The compiled Linux output libraries can be found in the GoPxL_SDK/lib/linux_x64 directory.
System Requirements
The GoPxL SDK can be compiled using the following environment.
For Windows:
- Visual Studio 2017 or later
- Windows SDK (included with Visual Studio installation)
For Linux:
- GCC X64 compiler, version 7.5.0 (GccX64_7.5.0-p3)
- GNU Make
Accessing Documentation
The full SDK class references and REST API resources are available at the following locations:
GoPxL SDK Class Reference
C++: GoPxL_SDK_Cpp\doc\GoPxLSdk\GoPxLSdk.html
.NET: GoPxL_SDK_dotNet\doc\GoPxLSdk\GoPxLSdk.html
REST API Resources
C++: GoPxL_SDK_Cpp\doc\rest-api-doc.html
.NET: GoPxL_SDK_dotNet\doc\rest-api-doc.html
Sample Projects
Sample projects showing how to perform various operations are provided, each one demonstrating a specific area. Examples are located in the following folders:
- C++: GoPxL_SDK_Cpp\Gocator\GoPxLSdk\samples
- .NET: GoPxL_SDK_dotNet\Gocator\GoPxLSdkNet\samples
Header Files
When including header files from the GoPxL SDK, reference the GoPxLSDK directory as the source directory. For example:
#include <GoPxLSdk/GoRestClient.h>.
Additionally, note that the SDK header files reference files from the kApi directory. For example:
#include <kApi/kApiDef.h>.
Getting Started with the SDK
GoPxL offers a simple programming API interface for connecting, configuring, and acquiring data from sensors and the GoMax vision accelerator.
|
|
Example code shown below is for C++. |
All GoPxL SDK programs should have the sequence described below, at a minimum.
Connecting a Device
The following sequence assumes you know the IP address of the device. If you do not know the IP address, or if the address is dynamic, an application can discover the devices that are available on the network using the GoPxL SDK discovery capability. For more information, see Discover Devices.
| 1. | Initialize the SDK library |
For C++ SDK programs only, construct the SDK library by calling GoApiLib_Construct. You must call GoApiLib_Construct before any API functions are used. (.NET SDK programs don’t require this.)
// Constructs GoPxL API core framework.
GoApiLib_Construct(&goApiLib)After completing your operations with the SDK library, don't forget to release the resources using kDestroyRef().
// Releases resources and resets the object handle to kNULL
kDestroyRef(&goApiLib)| 2. | Instantiate a GoSystem object and connect the device. |
// Define device IP address and control port
constexpr const char* DEVICE_IP_ADDRESS = "192.168.1.10";
constexpr const uint32_t CONTROL_PORT = GO_PXL_SDK_DEFAULT_CONTROL_PORT; // Defaults is 3600
// Parse device IP address
kIpAddress deviceIpAddress;
kIpAddress_Parse(&deviceIpAddress, DEVICE_IP_ADDRESS);
// Create a GoSystem object
GoSystem system;
// Set up connection
system.SetAddress(deviceIpAddress);
system.SetControlPort(CONTROL_PORT);
// Connect to the device
system.Connect();GoSystem Class Member Functions
The GoSystem class represents a single Gocator system. A Gocator system consists of one or more sensors/devices. Below are the member functions of the GoSystem class
// SetAddress: Sets the IP address used for connecting to the device.
void SetAddress(const kIpAddress& ipAddress);
// Address: Gets the IP address used for connecting to the device.
kIpAddress Address() const;
// SetControlPort: Sets the control port used for connecting to the device.
void SetControlPort(k32u port);
// ControlPort: Gets the control port used for connecting to the device.
k32u ControlPort() const;
// Connect: Connects to the device.
void Connect();
// Disconnect: Disconnects from the device.
void Disconnect();
// IsConnected: Checks if the device is connected.
bool IsConnected();
// Start: Starts the device.
void Start();
// Stop: Stops the device.
void Stop();
// RunningState: Gets the current state of the device.
State RunningState();
// Client: Returns a reference to the REST API client for performing operations.
GoRestClient& Client();
// SensorPath: Retrieves the REST API resource path of a sensor based on its serial number.
ResourcePath SensorPath(SerialNum serialNum);Discover Devices
If a device IP address is not known (for example, because it is assigned through DHCP), you can discover the devices available on the network using the GoPxL SDK discovery function:
| 1. | Include the GoDiscoveryClient header file. |
| 2. | Create an instance of GoDiscoveryClient and call the BlockingDiscover function with a specified timeout. |
| 3. | Access the list of discovered instances. |
#include "GoDiscoveryClient.h"
auto discovery = std::make_unique<GoDiscoveryClient>();
discovery->BlockingDiscover(3000);
auto& instances = discovery->InstanceList();| 4. | After discovering the instances, you can loop through the instances to get IP addresses and other instance-related information. |
// Print instance IP address and GDP port.
for (const auto& instance : instances) {
std::cout << "IP Address: " << kIpAddress_AsString(instance.GetIpAddress()) << std::endl;
std::cout << "GDP Port: " << instance.GetGdpPort() << std::endl;
}For more information, see the Discover sample.
Configure Device Settings
You configure GoPxL device settings, which are represented as JSON resources, through JSON-based REST API commands. The GoRestClient class provides access to read and write settings. You can use methods like Call, Read, Update, Create, and Delete, among others, to interact with the device settings.
Start by instantiating a GoSystem object. Through this object, you can directly access the GoRestClient instance via system.Client(). Then, to perform Read() or other operations, simply continue chaining the methods, for example, system.Client().Read().
These methods follow a similar format:
"command /path/to/callable/resource {'argument':'value'}"
For example the following command:
call /jobs/commands/rename { "sourceName" : "job1", "destName" : "renamedJob1" }
can be implemented as follows:
// Rename job.
auto payload = GoJson(R"({
"sourceName" : "SDK-demo",
"destName" : "SDK-demo-job"
})");
system.Client().Call("/jobs/commands/rename", payload);For the full list of resources available, see the GoPxL 1.1 - REST API Resources and User Guide:
C++: GoPxL_SDK_Cpp\doc\rest-api-doc.html
.NET: GoPxL_SDK_dotNet\doc\rest-api-doc.html
It's important to understand that GoPxL device settings are divided into two general types:
- sensor-level: These settings only apply to individual sensors.
- scanner-level: These settings apply to all of the sensors in a group of sensors (a "scanner").
To help explain the functions, some sections below include definitions of the API resources.
Accessing Sensor Resources
The most common use case is modifying settings that apply to individual sensors, such as exposure or active area.
If you know a device's serial number, you can access the corresponding resource using the SensorPath function. You can then modify the settings under the sensor's resources.
// Update single exposure value.
auto sensorPath = system.SensorPath(sensorSerialNumber);
auto payload = GoJson(R"({
"parameters" : {
"exposureSettings" : {
"exposureMode" : 0,
"singleExposure" : 400
}
}
})");
system.Client().Update(sensorPath, payload);Accessing Scanner Resources
You access system-level settings (those that apply to a group of sensors) through the scanner resources.
If you know the engine ID and scanner ID (available in the REST API reference documentation), you can use the following to access the sensor group and modify the trigger setting:
// Access and modify trigger settings for the scanner.
auto scannerPath = "/scan/engines/LMILaserLineProfiler/scanners/scanner-0";
auto payload = GoJson(R"({
"parameters" : {
"triggerSettings" : {
"source" : 3
}
}
})");
system.Client().Update(scannerPath, payload);Configuring scanner resources through the SDK is less common. These resources are related to physical setup. Normally, you configure these settings through the user interface during the initial system installation and setup, and the settings don’t need to change for different production runs.
Accessing an Array Element
Some resources are returned as an array. One example is the visibleSensors resource, which can have multiple elements.
The following returns an array of sensors under the /scan/visibleSensors resource path.
sensors = system.Client().Read("/scan/visibleSensors/").GetResponse().Content().At("sensors");
// Get the first element in the array
auto sensor = sensors.Begin();
auto sensorSerialNumber = sensor.Value().At("/serialNumber").Get<std::string>();
// Alternatively, iterate through each sensor in the array
for (auto sensor = sensors.Begin(); sensor != sensors.End(); ++sensor)
auto sensorSerialNumber = sensor.At("/serialNumber").Get<std::string>();
}Receive Device Data
GoPxL streams out acquired data (such as Profile and Surface data, and measurements) using the GoPxL Data Protocol (GDP). To receive the data, you use a GoGdpClient instance, which you first need to connect to the device. You can use GoPxLSdk::MessageType to identify the type of data received and the associated stamp information. Stamps contain encoder and trigger timing information, current time, and frame index, and are grouped into datasets with their corresponding data.
Data can be received on the same thread used for controlling the sensors (that is, synchronously) or on a different thread (that is, asynchronously). Note that data is received as the GoDataSet type. For more information on GoDataSet, see GDP Data Types.
For synchronous data retrieval, use the ReceiveData() method:
| 1. | Instantiate a GoPxL Data Protocol client and connect to a device. |
#include <GoPxLSdk/GoGdpClient.h>
constexpr k32u GDP_PORT = GO_PXL_SDK_DEFAULT_GDP_SERVER_PORT; // Default port is 3601
// Instantiate a GoGdpClient object
auto gdpClient = std::make_unique<GoGdpClient>();
// Connect the GoGdpClient to the device using sensor IP and GDP port
gdpClient->Connect(SENSOR_IP, GDP_PORT);| 2. | Receive data. |
// Establish a synchronous data transfer with a 3-second timeout.
gdpClient->ReceiveDataSync(3000);
// Retrieve the received data set.
const GoDataSet& receivedDataSet = gdpClient->DataSet();Then loop through each message (a unit of data received from the GoPxL sensor) to handle the data based on its type (Profile, Surface, Measurements, and so on) using the MessageType enum. For example:
for (size_t i = 0; i < receivedDataSet.Count(); ++i)
{
switch (receivedDataSet.GdpMsgAt(i).Type())
{
case GoPxLSdk::MessageType::STAMP:
// Handle stamp message
...
case GoPxLSdk::MessageType::UNIFORM_SURFACE:
// Handle uniform surface data
...
}
}For more information on synchronous data retrieval, see the ReceiveProfile and ReceiveSurface samples.
For asynchronous data retrieval, you use the following steps:
| 1. | Instantiate a GoPxL Data Protocol client and connect to a device. |
| 2. | Start the data reception thread |
Call GoGdpClient::ReceiveDataAsync(func) to initiate data reception asynchronously. This starts a background thread (receiveThread) to receive and deserialize messages continuously.
| 3. | Handle received data. |
Upon receiving individual data messages, they are reassembled into a GoDataSet object. The data reception continues until you call GoGdpClient::Close().
| 4. | Process the data. |
The received data sets are added to a message queue (Go::MsgQueue<GoDataSet> dataQueue). A separate thread (dataThread) removes the data sets from the queue for processing.
| 5. | Access the data |
Define a callback function to handle the received data sets.
The following is an example of retrieving data asynchronously:
void onData(const GoDataSet& receivedDataSet)
{
for (size_t i = 0; i < receivedDataSet.Count(); i++)
{
switch (receivedDataSet.GdpMsgAt(i).Type())
{
case GoPxLSdk::MessageType::STAMP:
{
const GoGdpStamp& stampMsg = (const GoGdpStamp&)receivedDataSet.GdpMsgAt(i);
// Process stamp message
...
}
// Handle other message types as needed
}
}
}
// Connect to GDP and start receiving data asynchronously
gdpClient->Connect(SENSOR_IP, GDP_PORT);
gdpClient->ReceiveDataAsync(onData);For details, see the ReceiveAsync sample.
The following lists the GoGdpClient class methods you can use to interact with the GoPxL Data Protocol (GDP) server.
// Constructs GoGdpClient.
GoGdpClient();
// Destructs GoGdpClient.
~GoGdpClient();
// Connects to the GdpServer.
void Connect(kIpAddress ipAddr, k32u port);
// Closes the TCP connection.
void Close();
// Receives data synchronously from the GDP server.
void ReceiveDataSync(k64u receiveTimeoutInMilliseconds);
// Receives data asynchronously from the GDP server.
void ReceiveDataAsync(std::function<void(const GoDataSet& receivedDataSet)>& func);
// Gets the pointer to the received data set over the Goctor Data Protocol.
const GoDataSet& DataSet() const;Receive Health and Metrics Information
Health information, along with various metrics, is transmitted using the REST API. To handle received metrics data, set up a callback function as shown below:
// Callback function for handling received metrics data.
static void onMetrics(const GoStreamResponse&)
{
// Extract payload & content from the received data
auto content = notification.Payload();
int appUptime = content.Get<int>("/appUpTime");
...
}
// Set up the callback function for receiving metrics data asynchronously.
system.Client().SetStreamHandler(onMetrics);
// Start the stream to receive metrics data from the specified path
system.Client().StartStream("/system/metrics");
// Stop the stream and disconnect from receiving metrics data, call StopStream
system.Client().StopStream("/system/metrics");For more information, see the ReceiveHealth sample.
Accelerated Devices
Control of devices accelerated by GoMax NX or a PC instance of GoPxL uses the same function API. The only difference is that you must use the IP address of the GoMax NX device or the PC running GoPxL when connecting to the device (that is, in system->Connect()).
GDP Data Types
Value Types
The GoPxL SDK is built on a set of basic data structures, utilities, and functions, which are contained in the kApi library.
The following basic value types are used by the kApi library.
| Type | Description |
|---|---|
| k8u | 8-bit unsigned integer |
| k16u | 16-bit unsigned integer |
| k16s | 16-bit signed integer |
| k32u | 32-bit unsigned integer |
| k32s | 32-bit signed integer |
| k64s | 64-bit signed integer |
| k64u | 64-bit unsigned integer |
| k64f | 64-bit floating number |
| kBool | Boolean, value can be kTRUE or kFALSE |
| kStatus | For the definitions of this type, in the folder containing the GoPxL SDK, see Platform\kApi\kApi\kApiDef.h. |
| kIpAddress | IP address |
Output Types
Data outputs are encapsulated as data messages in the GoPxL SDK. The following message types are available in the SDK.
| Type | Description |
|---|---|
|
GoGdpBoundingBox |
Bounding Box results output based on part matching results |
|
GoGdpFeaturePoint |
Feature point output |
|
GoGdpFeaturePlane |
Feature plane output |
|
GoGdpFeatureLine |
Feature line output |
|
GoGdpFeatureCircle |
Feature circle output |
|
GoGdpImage |
Video image |
|
GoGdpMeasurement |
Measurement output |
|
GoGdpMesh |
Mesh data output |
|
GoGdpNull |
Contains no valid data. Received when a measurement tool’s data output doesn’t generate data when triggered. This messages allow user to synchronize message from different outputs based on number of message received. |
|
GoGdpProfilePointCloud |
Profile point cloud data (non-uniform spacing) |
|
GoGdpProfileUniform |
Uniform spacing / resampled profile data |
|
GoGdpRendering |
Graphics objects associated with a tool outputs* |
|
GoGdpSpots |
Detected spots when overlay exposure is enabled* |
|
GoGdpStamp |
Acquisition stamp |
|
GoGdpSurfacePointCloud |
Surface point cloud data (non-uniform spacing) |
|
GoGdpSurfaceUniform |
Uniform spacing / resampled surface data |
*Not commonly used in a production system.
All of the messages above are extended from GoGdpMsg. For more information, see GoDataSet.
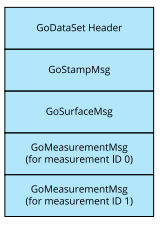
GoDataSet
Data is passed to the data handler in a GoDataSet object. The GoDataSet object is a container that can hold any type of data, including scan data (sections or surfaces), measurements, or results from various operations. Data inside the GoDataSet object is represented as messages. The following illustrates the content of a GoDataSet object of a Surface mode setup with two measurements.
The following lists the available GoDataSet types:
enum struct MessageType : k16u {
SIGNAL = 1, // Signals that data on a stream is invalidated.
NULL_TYPE = 10, // Null data type that contains a status code.
STAMP = 11, // Stamp information.
UNIFORM_PROFILE = 12, // Uniform profile data.
PROFILE_POINT_CLOUD = 13, // Raw profile data.
UNIFORM_SURFACE = 14, // Raw surface data.
SURFACE_POINT_CLOUD = 15, // Raw surface data.
IMAGE = 16, // Image data.
SPOTS = 17, // Spot data associated with the image.
MESH = 18, // Mesh data.
MEASUREMENT = 19, // Measurement data.
RENDERING = 70, // Graphical data associated with an output.
POINT_FEATURE = 71, // Point feature data.
LINE_FEATURE = 72, // Line feature data.
PLANE_FEATURE = 73, // Plane feature data.
CIRCLE_FEATURE = 74, // Circle feature data.
HEALTH = 100 // Health data.
};Measurement Values and Decisions
There are two outputs for each measurement: a value and a decision. A measurement value is returned as a 64-bit number.
The measurement decision specifies the state of the measurement value as follows:
| Decision | Description |
|---|---|
|
1 |
The measurement value is between the maximum and minimum decision values (inclusive). This is a pass decision. |
|
0 |
The measurement value is outside the maximum and minimum. This is a fail decision. |